|
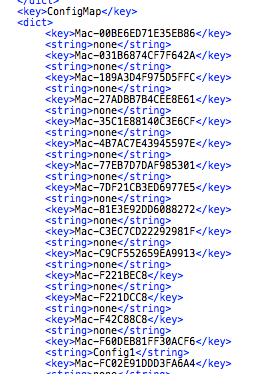
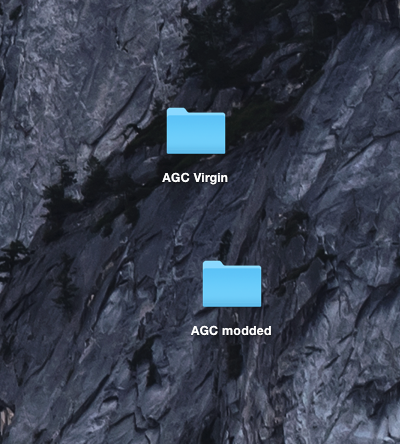
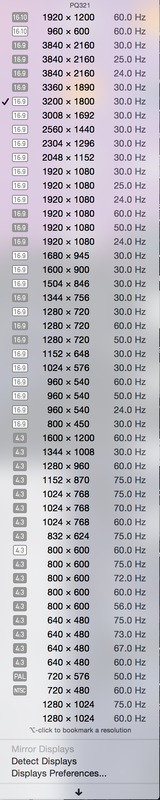
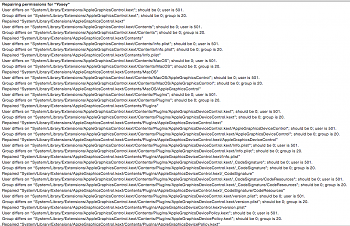
I wrote before about the phrase "4K" having several different meanings. Knowing whether your display is SST or MST is crucial. SST looks like it means "Super Speed Transport" but actually means Single Stream Transport. MST stands for Multi Stream Transport. This means that 2 distinct display signals get sent down the DP cable as if they are meant for 2 different displays, but instead they get sewn together for one display. Apple has choosen to not allow the cMP to run 4K MST displays at 60Hz. But there is a way to enable it. To start with you will need GTX6xx or newer and an MST 4K display. SST 4K displays work without help on the right GPUs. First and foremost, I recomend "Display Menu" app. It gives you many more resolution options than Display Preferences and yet doesn't require an advanced degree in Calculus like the other app from France. I am going to warn you that fiddling with this stuff is frustrating and frequently leads to multiple re-boots and plug yankings. Most of us have a spare SATA drive or 3, I recomend creating another working install that you can boot from in case of trouble. Because we need to modify one of Apple's kernel extensions you will need to run OS X in what is called "kext dev mode". This disables the requirement that every extension carry a digital signature approved by Apple to show that it hasn't been monkeyed with. This wasn't necessary in previous versions of OS X, but is now. To do this, open Terminal and type: sudo nvram boot-args="kext-dev-mode=1 nvda_drv=1" You will be asked for your password but you won't see anything happen as you type it in. Hit return. Next type in: nvram -p If you have done this correctly you will see: boot-args kext-dev-mode=1 nvda_drv=1 Create 2 folders on your desktop, "AGC Virgin" and "AGC Modded". The virgin one is in case you bugger this up. That folder will be your easy fix. Go here: Your Hard Drive ▸ System ▸ Library ▸ Extensions ▸ AppleGraphicsControl.kext Drag that item into both folders, this will create a copy in each leaving the original in the Extensions folder. Go to the one labeled "AGC Modded" and right click your way down to: AppleGraphicsControl.kext ▸ Contents ▸ PlugIns ▸ AppleGraphicsDevicePolicy.kext ▸ Contents Inside the "Contents" folder you will find some files. Open the info.plist in an editor that you know. I suggest either Plistinator or TextWrangler Find the little section I have pictured. These are the "black listed" machines. By running: ioreg -p IODeviceTree -r -n / -d 1 in terminal I find that my 4,1/5,1is F221BEC8. Change it, one digit will do. I change mine to F221BEC7. Save the plist and replace the original kext in the Extensions folder with the one you just modded. Next open Disk Utility and run a "repair permissions". If you have done this correctly you should see the various parts getting repaired, as in one of the images below. Now is a good time to try MST mode. It is 10 irritatingly random button pushes on the Asus/Sharp 321 displays. Like they thought you would only do this once. Would be AWESOME if there was a simple toggle like Dell has for 5K/4K on UP2715K. Now it gets exciting. Connect the MST display via an HDMI cable with display in the mode that allows you to choose form HDMI 1 or HDMI 2. If it is in "DUAL HDMI" mode it is looking for input from both. I believe it is the bottom button or next one up that lets you choose from "DisplayPort/HDMI 1/HDMI2". Once you have cable hooked to HDMI port, switch to that port. This should give you 4K at 30Hz, like you have been seeing on DP port. To be clear, you now have the 321 connected via both DP and HDMI, but you are viewing it through HDMI but leaving both cables connected. You will have a "ghost display" at this point, just remember that if the cursor vanishes. The moment is here, reboot. Wait until the desktop is fully loaded on the HDMI port and all is settled. Now hit that button to cycle through the input ports again and choose "DisplayPort". If all has gone as planned you will see the desktop in full glorious 4K at 60Hz. Once you are here, remove the HDMI plug and the display will cycle again and you will be 100% on DP, with no ghost display. Oddly, the only way to know via System Profiler or DisplayMenu is to NOT see "30Hz" after the 3840x2160 size. For some reason SST 4K will have "60Hz" after the size but MST leaves it blank. The easy way to know for sure is to Google "UFO 60Hz", the top hit should be a site that validates display refresh rates. A little UFO will be zipping across the screen in both 30Hz and 60Hz if this is working. The 60Hz one will look smooth and fluid while 30Hz one will look like it is hopping it's way across. And you, appalled, will wonder how you ever looked at such a clunky refresh rate. Remember if you do a PRAM reset that boot args line is going to lose both the Nvidia driver and the devmode and you will need to enable them again. I only suggest this on the Asus/Sharp 321 twins with GTX600 or higher. (works on a GT640 with DP). I have heard that the Dell 321 version is different. This mod is easy to mess up, hence my encouragement to have a backup boot drive to do fixes from or to experiment on before your main drive gets messed up. If you do get it working, please post about it here. Note that you have to do the HDMI trick on every boot. If not it will probably not get to desktop.
11 Comments
Jean ROUSSEL
8/21/2015 02:49:19 am
Is it possible to do that with MP 2010 + Quadro K5000 + DELL UP3214Q?
rmo
12/16/2016 12:14:45 pm
I have mp 2,1 (upgraded from 1,1) with Quadro K620 and dell p2415q. It work great and drive 3840x2160 @60Hz, so HiDpi @2560x1440 mode is well for me
Ben W
3/2/2016 05:29:41 pm
Does this still work with El Capitan? Having trouble with the GTX 980 on a mid-2010 MP tower and a Sharp 321. Am I doing something wrong or is it just a no-go?
MVC
3/3/2016 07:27:08 pm
We have not tested it in some time and no longer have an MST monitor to test with. It is possible that it does not work in El Capitan.
James
1/16/2017 01:51:18 pm
Just tried this out - no luck. Can't figure out how to reset. Stuck with a single display setting and very slow log in time. Set the PRAM to no avail. Can you assist? Thanks!
Christopher Thake
9/7/2017 03:53:16 pm
Hi there, I have been testing this under Windows 8.1 on the Mac Pro 2012 I just installed it on.
marty
12/7/2017 11:06:55 pm
doesnt work. dont waste your time.
Pär Nordqvist
1/26/2018 02:36:05 am
Hello! I have some problems with my Mac Pro Quadcore mid 2012 with Nvidia Geforce GTX680 2048 MB. It gives not boot screen in 4K 60 Hz with displayport (it works with HDMI but then only 30 Hz). The screen is an HP Z27s. What kind of screen is that, MST or SST? 9/2/2018 01:04:35 am
Mac Pro Quadcore mid 2012 with Nvidia Geforce GTX680 2048 MB. 6/11/2020 02:21:58 am
Nice blog and absolutely outstanding. You can do something much better but i still say this perfect.Keep trying for the best. Let make your blogs more plentiful on instagram with our site 6/24/2020 01:08:54 am
Leave a Reply. |
Archives
April 2021
Categories |
 RSS Feed